Text Extraction
The Accelerated Data Science (ADS) SDK provides a text extraction
module. This module allows you to convert files such as PDF, and
Microsoft Word files into plain text. The data is stored in Pandas
dataframes and therefore it can easily be manipulated and saved. The text
extraction module allows you to read files of various file formats, and convert them
into different formats that can be used for text manipulation. The
most common DataLoader commands are desmonstrated, and some
advanced features, such as defining custom backend and file processor.
First, import the needed libraries:
import ads
import fsspec
import oci
import os
import pandas as pd
import shutil
import time
import tempfile

from ads.text_dataset.backends import Base
from ads.text_dataset.dataset import TextDatasetFactory as textfactory
from ads.text_dataset.extractor import FileProcessor, FileProcessorFactory
from ads.text_dataset.options import Options
from sklearn import metrics
from sklearn.linear_model import LogisticRegression
from sklearn.feature_extraction.text import TfidfVectorizer
from sklearn.model_selection import train_test_split

ads.set_debug_mode()
ads.set_auth("resource_principal")
Introduction
Text extraction is the process of extracting text from one document and converting it into another form, typically plain text. For example, you can extract the body of text from a PDF document that has figures, tables, images, and text. The process can also be used to extract metadata about the document. Generally, text extraction takes a corpus of documents and returns the extracted text in a structured format. In the ADS text extraction module, that format is a Pandas dataframe.
The Pandas dataframe has a record in each row. That record can be an entire document, a sentence, a line of text, or some other unit of text. In the examples, you explore using a row to indicate a line of text and an entire document. .
The ADS text extraction module supports:
Input formats:
text,pdfanddocxordoc.Output formats: Use
pandasfor Pandas dataframe, orcudffor a cuDF dataframe.Backends: Apache Tika (default) and pdfplumber (for PDF).
Source location: local block volume, and in cloud storage such as the Oracle Cloud Infrastructure (OCI) Object Storage.
Options to extract metadata.
You can manipulate files through the DataLoader object. Some of the
most common commands are:
.read_line(): Read files line-by-line. Each line corresponds to a record in the corpus..read_text(): Read files where each file corresponds to a record in the corpus..convert_to_text(): Convert document to text and then save them as plain text files..metadata_all()and.metadata_schema(): Extract metadata from each file.
Configuring the Input Data Source
The OCI Data Science service has a corpus of text documents that are used in the examples. This corpus is stored in a publically accessible OCI Object Storage bucket. The following variables define the Object Storage namespace and the bucket name. You can update these variables to point at your Object Storage bucket, but you might also have to change some of the code in the examples so that the keys are correct.
namespace = 'bigdatadatasciencelarge'
bucket = 'hosted-ds-datasets'
Load a Corpus
The TextDatasetFactory, which is aliased to textfactory in this
notebook, provides access to the DataLoader, and FileProcessor
objects. The DataLoader is a file format-specific object for reading
in documents such as PDF and Word documents. Internally, a data loader
binds together a file system interface (in this case
fsspec) for opening
files. The FileProcessor object is used to convert these files into plain
text. It also has an engine object to control the output format. For a
given DataLoader object, you can customize both the FileProcessor
and engine.
Generally, the first step in reading a corpus of documents is to obtain a
DataLoader object. For example, TextDatasetFactory.format('pdf')
returns a DataLoader for PDFs. Likewise, you can get a Word document
loaders by passing in docx or doc. You can choose an engine that
controls how the data is returned. The default engine is a Python
generator. If you want to use the data as a dataframe, then use the
.engine() method. A call to .engine('pandas') returns the data
as a Pandas dataframe. On a GPU machine, you can use cuDF dataframes with
a call to .engine('cudf').
The .format() method controls the backend with Apache Tika
and pdfplumber being builtin.
In addition, you can write your own backend and plug it into the system.
This allows you complete control over the backend. The file processor
is used to actually process a specific file format.
To obtain a DataLoader object, call the use the .format() method
on textfactory. This returns a DataLoader object that can
then be configured with the .backend(), .engine(), and
.options() methods. The .backend() method is used to define
which backend is to manage the process of parsing the corpus. If this is
not specified then a sensible default backend is chosen based on the
file format that is being processed. The .engine() method is used to
control the output format of the data. If it is not specified, then an
iterator is returned. The .options() method is used to add extra
fields to each record. These would be things such as the filename, or
metadata about the file. There are more details about this and the other
configuration methods in the examples.
Read a Dataset
In this example you create a DataLoader object by calling
textfactory.format('pdf'). This DataLoader object is configured
to read PDF documents. You then change the backend to use
pdfplumber with the method
.backend('pdfplumber'). It’s easier to work with the results
if they are in a dataframe. So, the method .engine('pandas')
returns a Pandas dataframe.
AFter you have the DataLoader object configured, you process the
corpus. In this example, the corpus is a single
PDF file. It is read from a publicly accessible OCI Object Storage
bucket. The .read_line() method is used to read in the corpus where
each line of the document is treated as a record. Thus, each row in the
returned dataframe is a line of text from the corpus.
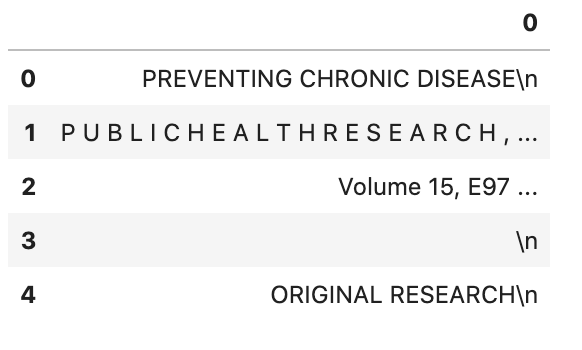
dl = textfactory.format('pdf').backend('pdfplumber').engine('pandas')
df = dl.read_line(
    f'oci://{bucket}@{namespace}/pdf_sample/paper-0.pdf',
    storage_options={"config": {}},
)
df.head()
Corpus Read Options
Typically, you want to treat each line of a document or each
document as a record. The method .read_line() processes a corpus,
and return each line in the documents as a text string. The method
.read_text() treats each document in the corpus as a record.
Both the .read_line() and .read_text() methods parse the corpus,
convert it to text ,and reads it into memory. The
.convert_to_text() method does the same processing as
.read_text(), but it outputs the plain text to files. This allows
you to post-process the data without having to again convert the raw
documents into plain text documents, which can be an expensive process.
Each document can have a custom set of metadata that describes the
document. The .metadata_all() and .metadata_schema()
methods allow you to access this metadata. Metadata is represented as a
key-value pair. The .metadata_all() returns a set of key-value pairs
for each document. The .metadata_schema() returns what keys are used
in defining the metadata. This can vary from document to document and
this method creates a list of all observed keys. You use this to
understand what metadata is available in the corpus.
The .read_line() Method
The .read_line() method allows you to read a corpus
line-by-line. In other words, each line in a file corresponds to one
record. The only required argument to this method is path. It sets
the path to the corpus, and it can contain a glob pattern. For example,
oci://{bucket}@{namespace}/pdf_sample/**.pdf,
'oci://{bucket}@{namespace}/20news-small/**/[1-9]*', or
/home/datascience/<path-to-folder>/[A-Za-z]*.docx are all valid
paths that contain a glob pattern for selecting multiple files. The
path parameter can also be a list of paths. This allows for reading
files from different file paths.
The optional parameter udf stands for a user-defined function. This
parameter can be a callable Python object, or a regular expression
(RegEx). If it is a callable Python object, then the function must accept
a string as an argument and returns a tuple. If the parameter is a RegEx,
then the returned values are the captured RegEx patterns. If there is no
match, then the record is ignored. This is a convenient method to
selectively capture text from a corpus. In either case, the udf is
applied on the record level, and is a powerful tool for data
transformation and filtering.
The .read_line() method has the following arguments:
df_args: Arguments to pass to the engine. It only applies to Pandas and cuDF dataframes.n_lines_per_file: Maximal number of lines to read from a single file.path: The path to the corpus.storage_options: Options that are necessary for connecting to OCI Object Storage.total_lines: Maximal number of lines to read from all files.udf: User-defined function for data transformation and filtering.
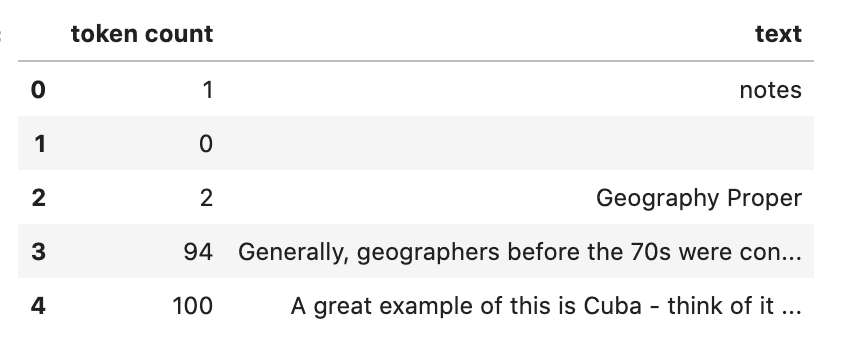
Example: Python Callable udf
In the next example, a lambda function is used to create a Python callable
object that is passed to the udf parameter. The lambda function
takes a line and splits it based on white space to tokens. It then
counts the number of tokens ,and returns a tuple where the first element
is the token count and the second element is the line itself.
The df_args parameter is used to change the column names into
user-friendly values.
dl = textfactory.format('docx').engine('pandas')
df = dl.read_line(
    path=f'oci://{bucket}@{namespace}/docx_sample/*.docx',
    udf=lambda x: (len(x.strip().split()), x),
    storage_options={"config": {}},
    df_args={'columns': ['token count', 'text']},
)
df.head()
Example: Regular Expression udf
In this example, the corpus is a collection of log files. A RegEx is used to parse the standard Apache log format. If a line does not match the pattern, it is discarded. If it does match the pattern, then a tuple is returned where each element is a value in the RegEx capture group.
This example uses the default engine, which returns an iterator. The
next() method is used to iterate through the values.
APACHE_LOG_PATTERN = r'^\[(\S+)\s(\S+)\s(\d+)\s(\d+\:\d+\:\d+)\s(\d+)]\s(\S+)\s(\S+)\s(\S+)\s(\S+)'
dl = textfactory.format('txt')
df = dl.read_line(
    f'oci://{bucket}@{namespace}/log_sample/*.log',
    udf=APACHE_LOG_PATTERN,
    storage_options={"config": {}},
)
next(df)
['Sun',
 'Dec',
 '04',
 '04:47:44',
 '2005',
 '[notice]',
 'workerEnv.init()',
 'ok',
 '/etc/httpd/conf/workers2.properties']
The .read_text() Method
It you want to treat each document in a corpus as a record, use the
.read_text() method. The path parameter is the only required
parameter as it defines the location of the corpus.
The optional udf parameter stands for a user-defined function. This
parameter can be a callable Python object or a RegEx.
The .read_text() method has the following arguments:
df_args: Arguments to pass to the engine. It only applies to Pandas and cuDF dataframes.path: The path to the corpus.storage_options: Options that are necessary for connecting to OCI Object Storage.total_files: The maximum number of files that should be processed.udf: User-defined function for data transformation and filtering.
Example: total_files
In this example, the are six files in the corpus. However, the
total_files parameter is set to 4 so only the first four files are
processed. There is no guarantee which four will actually be processed.
However, this parameter is commonly used to limit the size of the data
when you are developing the code for the model. Later on, it is often
removed so the entire corpus is processed.
This example also demonstrates the use of a list, plus globbing, to
define the corpus. Notice that the path parameter is a list with two
file paths. The output shows the dataframe has four rows and so only
four files were processed.
dl = textfactory.format('docx').engine('pandas')
df = dl.read_text(
    path=[f'oci://{bucket}@{namespace}/docx_sample/*.docx', f'oci://{bucket}@{namespace}/docx_sample/*.doc'],
    total_files=4,
    storage_options={"config": {}},
)
df.shape
(4, 1)
The .convert_to_text() Method
Converting a set of raw documents can be an expensive process. The
.convert_to_text() method allows you to convert a corpus of source
document,s and write them out as plain text files. Each document input
document is written to a separate file that has the same name as the
source file. However, the file extension is changed to .txt.
Converting the raw documents allows you to post-process
the raw text multiple times while only have to convert it once.
The src_path parameter defines the location of the corpus. The dst_path
parameter gives the location where the plain text files are to be
written. It can be an Object Storage bucket or the local block storage.
If the directory does not exist, it is created. It overwrites
any files in the directory.
The .convert_to_text() method has the following arguments:
dst_path: Object Storage or local block storage path where plain text files are written.encoding: Encoding for files. The default isutf-8.src_path: The path to the corpus.storage_options: Options that are necessary for connecting to Object Storage.
The following example converts a corpus ,and writes it to a temporary directory. It then lists all the plain text files that were created in the conversion process.
dst_path = tempfile.mkdtemp()
dl = textfactory.format('pdf')
dl.convert_to_text(
    src_path=f'oci://{bucket}@{namespace}/pdf_sample/*.pdf',
    dst_path=dst_path,
    storage_options={"config": {}},
)
print(os.listdir(dst_path))
shutil.rmtree(dst_path)
['paper-2.txt', 'paper-0.txt', 'Emerging Infectious Diseases copyright info.txt', 'Preventing Chronic Disease Copyright License.txt', 'Budapest Open Access Initiative _ Budapest Open Access Initiative.txt', 'paper-1.txt']
Each document can contain metadata. The purpose of the
.metadata_all() method is to capture this information for each
document in the corpus. There is no standard set of metadata across all
documents so each document could return different set of values.
The path parameter is the only required parameter as it defines the
location of the corpus.
The .metadata_all() method has the following arguments:
encoding: Encoding for files. The default isutf-8.path: The path to the corpus.storage_options: Options that are necessary for connecting to Object Storage.
The next example processes a corpus of PDF documents using
pdfplumber, and prints the metadata for the first document.
dl = textfactory.format('pdf').backend('pdfplumber').option(Options.FILE_NAME)
metadata = dl.metadata_all(
    path=f'oci://{bucket}@{namespace}/pdf_sample/Emerging Infectious Diseases copyright info.pdf',
    storage_options={"config": {}}
)
next(metadata)
{'Creator': 'Mozilla/5.0 (Macintosh; Intel Mac OS X 10_15_7) AppleWebKit/537.36 (KHTML, like Gecko) Chrome/91.0.4472.114 Safari/537.36',
 'Producer': 'Skia/PDF m91',
 'CreationDate': "D:20210802234012+00'00'",
 'ModDate': "D:20210802234012+00'00'"}
The backend that is used can affect what metadata is returned. For
example, the Tika backend returns more metadata than pdfplumber, and also
the names of the metadata elements are also different. The following
example processes the same PDF document as previously used, but you can see that
there is a difference in the metadata.
dl = textfactory.format('pdf').backend('default')
metadata = dl.metadata_all(
    path=f'oci://{bucket}@{namespace}/pdf_sample/Emerging Infectious Diseases copyright info.pdf',
    storage_options={"config": {}}
)
next(metadata)
{'Content-Type': 'application/pdf',
 'Creation-Date': '2021-08-02T23:40:12Z',
 'Last-Modified': '2021-08-02T23:40:12Z',
 'Last-Save-Date': '2021-08-02T23:40:12Z',
 'X-Parsed-By': ['org.apache.tika.parser.DefaultParser',
  'org.apache.tika.parser.pdf.PDFParser'],
 'access_permission:assemble_document': 'true',
 'access_permission:can_modify': 'true',
 'access_permission:can_print': 'true',
 'access_permission:can_print_degraded': 'true',
 'access_permission:extract_content': 'true',
 'access_permission:extract_for_accessibility': 'true',
 'access_permission:fill_in_form': 'true',
 'access_permission:modify_annotations': 'true',
 'created': '2021-08-02T23:40:12Z',
 'date': '2021-08-02T23:40:12Z',
 'dc:format': 'application/pdf; version=1.4',
 'dcterms:created': '2021-08-02T23:40:12Z',
 'dcterms:modified': '2021-08-02T23:40:12Z',
 'meta:creation-date': '2021-08-02T23:40:12Z',
 'meta:save-date': '2021-08-02T23:40:12Z',
 'modified': '2021-08-02T23:40:12Z',
 'pdf:PDFVersion': '1.4',
 'pdf:charsPerPage': '2660',
 'pdf:docinfo:created': '2021-08-02T23:40:12Z',
 'pdf:docinfo:creator_tool': 'Mozilla/5.0 (Macintosh; Intel Mac OS X 10_15_7) AppleWebKit/537.36 (KHTML, like Gecko) Chrome/91.0.4472.114 Safari/537.36',
 'pdf:docinfo:modified': '2021-08-02T23:40:12Z',
 'pdf:docinfo:producer': 'Skia/PDF m91',
 'pdf:encrypted': 'false',
 'pdf:hasMarkedContent': 'true',
 'pdf:hasXFA': 'false',
 'pdf:hasXMP': 'false',
 'pdf:unmappedUnicodeCharsPerPage': '0',
 'producer': 'Skia/PDF m91',
 'xmp:CreatorTool': 'Mozilla/5.0 (Macintosh; Intel Mac OS X 10_15_7) AppleWebKit/537.36 (KHTML, like Gecko) Chrome/91.0.4472.114 Safari/537.36',
 'xmpTPg:NPages': '1'}
The .metadata_schema() Method
As briefly discussed in the .metadata_all() method section,
there is no standard set of metadata across all documents. The
.metadata_schema() method is a convience method that returns what
metadata is avalible in the corpus. It returns a list of all observed
metadata fields in the corpus. Since each document can have a different
set of metadata, all the values returned may not exist in all documents.
It should also be noted that the engine used can return different
metadata for the same document.
The path parameter is the only required parameter as it defines the
location of the corpus.
Often, you don’t want to process an entire corpus of documents to get a
sense of what metadata is available. Generally, the engine returns a
fairly consistent set of metadata. The n_files option is handy
because it limits the number of files that are processed.
The .metadata_schema() method has the following arguments:
encoding: Encoding for files. The default isutf-8.n_files: Maximum number of files to process. The default is1.path: The path to the corpus.storage_options: Options that are necessary for connecting to Object Storage.
The following example uses the .metadata_schema() method to collect the
metadata fields on the first two files in the corpus. The n_files=2
parameter is used to control the number of files that are processed.
dl = textfactory.format('pdf').backend('pdfplumber')
schema =dl.metadata_schema(
    f'oci://{bucket}@{namespace}/pdf_sample/*.pdf',
    storage_options={"config": {}},
    n_files=2
)
print(schema)
['ModDate', 'Producer', 'CreationDate', 'Creator']
Augment the Records
The text_dataset module has the ability to augment the returned
records with additional information using the
.option() method. This method takes an enum from the Options
class. The .option() method can be used multiple times on the same
DataLoader to select a set of additional information that is
returned. The Options.FILE_NAME enum returns the filename that
is associated with the record. The Options.FILE_METADATA enum allows you
to extract individual values from the document’s metadata. Notice that the
engine used can return different metadata for the
same document.
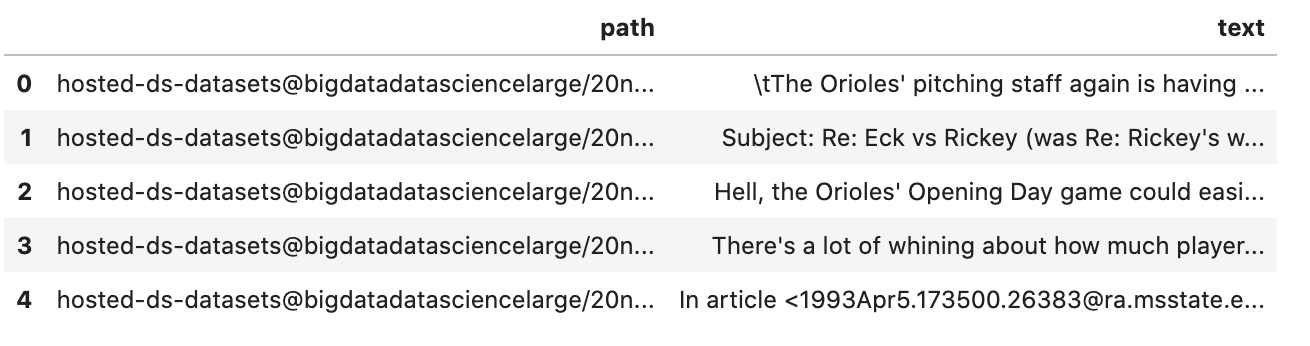
Example: Using Options.FILE_NAME
The following example uses .option(Options.FILE_NAME) to augment to add
the filename of each record that is returned. The example uses the
txt for the FileProcessor, and Tika for the backend. The engine
is Pandas so a dataframe is returned. The df_args option is used to
rename the columns of the dataframe. Notice that the returned dataframe
has a column named path. This is the information that was added to
the record from the .option(Options.FILE_NAME) method.
dl = textfactory.format('txt').backend('tika').engine('pandas').option(Options.FILE_NAME)
df = dl.read_text(
    path=f'oci://{bucket}@{namespace}/20news-small/**/[1-9]*',
    storage_options={"config": {}},
    df_args={'columns': ['path', 'text']}
)
df.head()
Example: Using Options.FILE_METADATA
You can add metadata about a document to a record using
.option(Options.FILE_METADATA, {'extract': ['<key1>, '<key2>']}).
When using Options.FILE_METADATA, there is a required second
parameter. It takes a dictionary where the key is the action to be
taken. In the next example, the extract key provides a
list of metadata that can be extracted. When a list is used, the
returned value is also a list of the metadata values. The example
uses repeated calls to .option() where different metadata
values are extracted. In this case, a list is not returned, but
each value is in a separate Pandas column.
dl = textfactory.format('docx').engine('pandas') \
    .option(Options.FILE_METADATA, {'extract': ['Character Count']}) \
    .option(Options.FILE_METADATA, {'extract': ['Paragraph-Count']}) \
    .option(Options.FILE_METADATA, {'extract': ['Author']})
df = dl.read_text(
    path=f'oci://{bucket}@{namespace}/docx_sample/*.docx',
    storage_options={"config": {}},
    df_args={'columns': ['character count', 'paragraph count', 'author', 'content']},
)
df.head()

Custom File Processor and Backend
The text_dataset module supports a number of file processors and
backends. However, it isn’t practical to provide these for all possible
documents. So, the text_dataset allows you to create your
own.
When creating a custom file processor, you must register it with ADS
using the FileProcessorFactory.register() method. The
first parameter is the name that you want to associate with the file
processor. The second parameter is the class that is to be registered.
There is no need to register the backend class.
Custom Backend
To create a backend, you need to develop a class that inherits from the
ads.text_dataset.backends.Base class. In your class, you need to
overload any of the following methods that you want to use with:
.read_line(), .read_text(), .convert_to_text(), and
.get_metadata(). The .get_metadata() method must be overload if
you want to use the .metadata_all() and .metadata_schema()
methods in your backend.
The .convert_to_text() method takes a file handler, destination
path, filename, and storage options as parameters. This method must write
the plain text file to the destination path, and return the path of the
file.
The .get_metadata() method takes a file handler as an input parameter,
and returns a dictionary of the metadata. The .metadata_all() and
.metadata_schema() methods don’t need to be overload because they use the
.get_metadata() method to return their results.
The .read_line() method must take a file handle, and have a yield
statement that returns a plain text line from the document.
The .read_text() method has the same requirements as the
.read_line() method, except it must yield the entire document as
plain text.
The following are the method signatures:
convert_to_text(self, fhandler, dst_path, fname, storage_options)
get_metadata(self, fhandler)
read_line(self, fhandler)
read_text(self, fhandler)
Custom File Processor
To create a custom file processor you must develop a class that inherits
from ads.text_dataset.extractor.FileProcessor. Generally, there are
no methods that need to be overloaded. However, the
backend_map class variable has to be defined. This is a dictionary
where the key is the name of the format that it support,s and the value
is the file processor class. There must be a key called default
that is used when no file processor is defined for the DataLoader.
An example of the backend_map is:
backend_map = {'default': MyCustomBackend, 'tika': Tika, 'custom': MyCustomBackend}
Example: Create a Custom File Processor and Backend
In the next example, you create a custom backend class called
ReverseBackend. It overloads the .read_line() and
.read_text() methods. This toy backend returns the records in
reverse order.
The TextReverseFileProcessor class is used to create a new file
processor for use with the backend. This class has the backend_map class
variable that maps the backend label to the backend
object. In this case, the only format that is provided is the default
class.
Having defined the backend (TextReverseBackend) and file processor
(TextReverseFileProcessor) classes, the format must be registered.
You register it with the
FileProcessorFactory.register('text_reverse', TextReverseFileProcessor)
command where the first parameter is the format and the second parameter is the
file processor class.
class TextReverseBackend(Base):
    def read_line(self, fhandler):
        with fhandler as f:
            for line in f:
                yield line.decode()[::-1]

    def read_text(self, fhandler):
        with fhandler as f:
            yield f.read().decode()[::-1]

class TextReverseFileProcessor(FileProcessor):
    backend_map = {'default': TextReverseBackend}

FileProcessorFactory.register('text_reverse', TextReverseFileProcessor)
Having created the custom backend and file processor, you use the
.read_line() method to read in one record and print it.
dl = textfactory.format('text_reverse')
reverse_text = dl.read_line(
    f'oci://{bucket}@{namespace}/20news-small/rec.sport.baseball/100521',
    total_lines=1,
    storage_options={"config": {}},
)
text = next(reverse_text)[0]
print(text)
)uiL C evetS( ude.uhj.fch.xinuhj@larimda :morF
The .read_line() method in the TextReverseBackend class reversed
the characters in each line of text that is processed. You can confirm
this by reversing it back.
text[::-1]
'From: admiral@jhunix.hcf.jhu.edu (Steve C Liu)n'