HuggingFacePipelineModel#
New in version 2.8.2.
Overview#
The ads.model.framework.huggingface_model.HuggingFacePipelineModel class in ADS is designed to allow you to rapidly get a HuggingFace pipelines into production. The .prepare() method creates the model artifacts that are needed to deploy a functioning pipeline without you having to configure it or write code. However, you can customize the required score.py file.
The .verify() method simulates a model deployment by calling the load_model() and predict() methods in the score.py file. With the .verify() method, you can debug your score.py file without deploying any models. The .save() method deploys a model artifact to the model catalog. The .deploy() method deploys a model to a REST endpoint.
The following steps take your trained HuggingFacePipelineModel model and deploy it into production with a few lines of code.
Create a HuggingFace Pipeline
Load a ImageSegmentationPipeline pretrained model.
>>> from transformers import pipeline

>>> segmenter = pipeline(task="image-segmentation", model="facebook/detr-resnet-50-panoptic", revision="fc15262")
>>> preds = segmenter(
...     "https://huggingface.co/datasets/huggingface/documentation-images/resolve/main/pipeline-cat-chonk.jpeg"
... )
>>> preds
[{'score': 0.987885,
    'label': 'LABEL_184',
    'mask': <PIL.Image.Image image mode=L size=960x686>},
    {'score': 0.997345,
    'label': 'snow',
    'mask': <PIL.Image.Image image mode=L size=960x686>},
    {'score': 0.997247,
    'label': 'cat',
    'mask': <PIL.Image.Image image mode=L size=960x686>}]
Prepare a Custom Conda Pack#
To do a image segmentation model, you can start with the PyTorch conda pack with slug pytorch110_p38_cpu_v1.
Run
pip install timmsince image segmentation model requirestimm.Then use
odsc conda init -b your_bucket_name -n bucket_namespaceto config where to store the published conda pack if you have not done this yet.Lastly, run
odsc conda publish -s pytorch110_p38_cpu_v1.Once it’s done, you can find the path of the pusblished conda pack under the Environment Explorer
Publishedtab. Refresh the page if you cannot find it.
Prepare Model Artifact#
>>> from ads.common.model_metadata import UseCaseType
>>> from ads.model import HuggingFacePipelineModel

>>> import tempfile

>>> # Prepare the model
>>> artifact_dir = "huggingface_pipeline_model_artifact"
>>> huggingface_pipeline_model = HuggingFacePipelineModel(model, artifact_dir=artifact_dir)
>>> huggingface_pipeline_model.prepare(
...    inference_conda_env="<your-conda-pack-path>",
...    inference_python_version="<your-python-version>",
...    training_conda_env="<your-conda-pack-path>",
...    use_case_type=UseCaseType.OTHER,
...    force_overwrite=True,
...)
# You don't need to modify the score.py generated. The model can be loaded by the transformers.pipeline.
# More info here - https://huggingface.co/docs/transformers/main_classes/pipelines#transformers.pipeline
Instantiate a HuggingFacePipelineModel() object with HuggingFace pipelines. All the pipelines related files are saved under the artifact_dir.
For more detailed information on what parameters that HuggingFacePipelineModel takes, refer to the API Documentation
Summary Status#
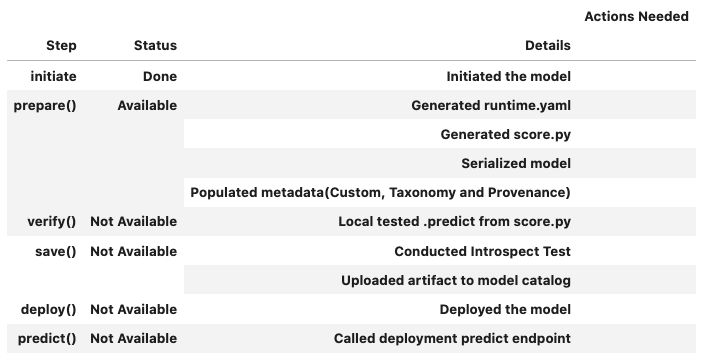
You can call the .summary_status() method after a model serialization instance such as GenericModel, SklearnModel, TensorFlowModel, or PyTorchModel is created. The .summary_status() method returns a Pandas dataframe that guides you through the entire workflow. It shows which methods are available to call and which ones aren’t. Plus it outlines what each method does. If extra actions are required, it also shows those actions.
The following image displays an example summary status table created after a user initiates a model instance. The table’s Step column displays a Status of Done for the initiate step. And the Details column explains what the initiate step did such as generating a score.py file. The Step column also displays the prepare(), verify(), save(), deploy(), and predict() methods for the model. The Status column displays which method is available next. After the initiate step, the prepare() method is available. The next step is to call the prepare() method.
Register Model#
>>> # Register the model
>>> model_id = huggingface_pipeline_model.save()

Model is successfully loaded.
['.model-ignore', 'score.py', 'config.json', 'runtime.yaml', 'preprocessor_config.json', 'pytorch_model.bin']

'ocid1.datasciencemodel.oc1.xxx.xxxxx'
Deploy and Generate Endpoint#
>>> # Deploy and create an endpoint for the huggingface_pipeline_model
>>> huggingface_pipeline_model.deploy(
...     display_name="HuggingFace Pipeline Model For Image Segmentation",
...     deployment_log_group_id="ocid1.loggroup.oc1.xxx.xxxxx",
...     deployment_access_log_id="ocid1.log.oc1.xxx.xxxxx",
...     deployment_predict_log_id="ocid1.log.oc1.xxx.xxxxx",
... )
>>> print(f"Endpoint: {huggingface_pipeline_model.model_deployment.url}")
Run Prediction against Endpoint#
>>> # Download an image
>>> import PIL.Image
>>> import requests
>>> import cloudpickle
>>> image_url = "https://huggingface.co/datasets/huggingface/documentation-images/resolve/main/pipeline-cat-chonk.jpeg"
>>> image = PIL.Image.open(requests.get(image_url, stream=True).raw)

>>> # Generate prediction by invoking the deployed endpoint
>>> preds = huggingface_pipeline_model.predict(image)["prediction"]
>>> print([{"score": round(pred["score"], 4), "label": pred["label"]} for pred in preds])
[{'score': 0.9879, 'label': 'LABEL_184'},
{'score': 0.9973, 'label': 'snow'},
{'score': 0.9972, 'label': 'cat'}]
Predict with Image#
Predict Image by passing a PIL.Image.Image object using the data argument in predict() to predict a single image.
The image will be converted to bytes using cloudpickle so it can be passed to the endpoint.
It will be loaded back to PIL.Image.Image in score.py before pass into the pipeline.
Note
The payload size limit is 10 MB. Read more about invoking a model deployment here.
Model deployment currently does not support internet(coming soon), hence you cannot pass in a url.
Predict with Multiple Arguments#
If your model takes more than one argument, you can pass in through dictionary with the keys as the argument name and values as the value of the arguement.
>>> your_huggingface_pipeline_model.verify({"parameter_name_1": "parameter_value_1", ..., "parameter_name_n": "parameter_value_n"})
>>> your_huggingface_pipeline_model.predict({"parameter_name_1": "parameter_value_1", ..., "parameter_name_n": "parameter_value_n"})
Run Prediction with oci sdk#
Model deployment endpoints can be invoked with the oci sdk. This example invokes a model deployment with the oci sdk with a bytes payload:
bytes payload example#
>>> # The OCI SDK must be installed for this example to function properly.
>>> # Installation instructions can be found here: https://docs.oracle.com/en-us/iaas/Content/API/SDKDocs/pythonsdk.htm

>>> import requests
>>> import oci
>>> from ads.common.auth import default_signer
>>> import cloudpickle
>>> import PIL.Image
>>> import cloudpickle
>>> headers = {"Content-Type": "application/octet-stream"}
>>> endpoint = huggingface_pipeline_model.model_deployment.url + "/predict"

>>> ## download the image
>>> image_url = "https://huggingface.co/datasets/Narsil/image_dummy/raw/main/parrots.png"
>>> image = PIL.Image.open(requests.get(image_link, stream=True).raw)
>>> image_bytes = cloudpickle.dumps(image)

>>> preds = requests.post(endpoint, data=image_bytes, auth=default_signer()['signer'], headers=headers).json()
>>> print([{"score": round(pred["score"], 4), "label": pred["label"]} for pred in preds['prediction']])
[{'score': 0.9879, 'label': 'LABEL_184'},
{'score': 0.9973, 'label': 'snow'},
{'score': 0.9972, 'label': 'cat'}]
Example#
from transformers import pipeline
from ads.model import HuggingFacePipelineModel

import tempfile
import PIL.Image
from ads.common.auth import default_signer
import requests
import cloudpickle

## download the image
image_url = "https://huggingface.co/datasets/Narsil/image_dummy/raw/main/parrots.png"
image = PIL.Image.open(requests.get(image_url, stream=True).raw)

## download the pretrained model
classifier = pipeline(model="openai/clip-vit-large-patch14")
classifier(
        images=image,
        candidate_labels=["animals", "humans", "landscape"],
    )

## Initiate a HuggingFacePipelineModel instance
zero_shot_image_classification_model = HuggingFacePipelineModel(classifier, artifact_dir=tempfile.mkdtemp())

# Autogenerate score.py, serialized model, runtime.yaml
conda_pack_path = "oci://bucket@namespace/path/to/conda/pack" # your published conda pack
python_version = "3.x" # Remember to update 3.x with your actual python version, e.g. 3.8
zero_shot_image_classification_model.prepare(inference_conda_env=conda_pack_path, inference_python_version = python_version, force_overwrite=True)

## Convert payload to bytes
data = {"images": image, "candidate_labels": ["animals", "humans", "landscape"]}
body = cloudpickle.dumps(data) # convert image to bytes

# Verify generated artifacts
zero_shot_image_classification_model.verify(data=data)
zero_shot_image_classification_model.verify(data=body)

# Register HuggingFace Pipeline model
zero_shot_image_classification_model.save()

## Deploy
log_group_id = "<log_group_id>"
log_id = "<log_id>"
zero_shot_image_classification_model.deploy(deployment_bandwidth_mbps=100,
                wait_for_completion=False,
                deployment_log_group_id = log_group_id,
                deployment_access_log_id = log_id,
                deployment_predict_log_id = log_id)
zero_shot_image_classification_model.predict(data)
zero_shot_image_classification_model.predict(body)

### Invoke the model by sending bytes
auth = default_signer()['signer']
endpoint = zero_shot_image_classification_model.model_deployment.url + "/predict"
headers = {"Content-Type": "application/octet-stream"}
requests.post(endpoint, data=body, auth=auth, headers=headers).json()